Replacing your toilet’s fill valve is a simple DIY job that can help you save money while improving the efficiency of your bathroom’s most important fixture. This blog will give you information about the steps so that even a beginner can confidently complete this task. If you have a few essential tools and want to replace the toilet, fill the valve on your own without paying a plumber’s fee. Not only will this repair improve your toilet’s performance, but it will also help save water in general. Remember that understanding how to replace toilet fill valves is essential for keeping your toilet functioning and running correctly.
What Are the Signs That I Need to Replace My Toilet Fill Valve?
Common indicators include a continuous toilet, a noisy fill cycle, or a slow refill rate. If adjusting the current valve doesn’t resolve these issues, a replacement might be necessary.
How Long Does It Take to Replace a Toilet Fill Valve?
Typically, replacing a toilet fill valve can be completed in under an hour, especially if you have all the necessary tools and a new valve ready. This time can increase if complications arise, such as cleaning corrosion from the tank’s inlet or adjusting the new valve to fit correctly.
Materials Required to Replace Fill Valve
Before you begin the replacement, ensure you have all the necessary materials on hand to make the process smooth and efficient:
- New toilet fill valve (preferably universal to fit most models)
- Adjustable wrench
- Sponge
- Small bucket
- Towels
- Plumber’s tape
How to Replace Toilet Fill Valve in 5 Steps?
Step1: Shut Off the Water Supply
First, locate the water supply valve, typically behind or at the toilet’s base. To stop the water flow to the tank, close this valve by turning it clockwise. After turning off the supply, flush the toilet to remove any leftover water in the tank. This step is essential to stop any water from overflowing when you open the tank.
Ensure the tank is as empty as possible; you might need to hold down the flush lever to ensure all the water drains out of the tank. After flushing, check the tank for any leftover water and, if needed, dry it out with a towel or sponge. Properly shutting off the water and ensuring the tank is empty will make the rest of the process cleaner and more accessible. Always double-check to ensure the valve is completely closed to avoid a potential flood.
Step 2: Remove the Old Fill Valve
Spread towels at the toilet’s base to catch spillage before removing the old fill valve. Once the tank has been drained, use a sponge to absorb any remaining water. Using an adjustable wrench, unscrew the water supply line from the old fill valve’s bottom. Hold the valve with your other hand to keep it from rotating and damaging the tank. Be cautious not to harm the interior of the tank, and carefully remove the old valve from it. To do this, you need to undo the locknut holding the valve under the tank.
Considering that some of the old valve’s components might be recyclable, dispose of it carefully. Keep the area dry and clean as you prepare to install the new valve. Handling the components gently during removal will prevent damage to the toilet’s ceramic tank.
Step 3: Install the New Fill Valve
Starting with the new fill valve, insert it into the same hole as the previous one, making sure the base of the valve fits flat against the tank opening. To ensure the new valve is sturdy, tighten the locknut that comes with it by hand beneath the tank. Avoid overtightening, as this may cause the tank to break. To avoid leaks, reattach the water connection to the bottom of the new fill valve and cover the threads with plumber’s tape before tightening the connection. Remember that all connections should be secure without being overly tight to preserve the fittings’ integrity.
Follow the manufacturer’s instructions for any specific installation details related to the model of fill valve you have purchased. Double-check that the valve is aligned correctly, as misalignment can cause water flow issues. Once secured, gently move the valve to ensure it is not loose and is correctly installed. Proper installation is vital to avoid leaks and ensure efficient operation.
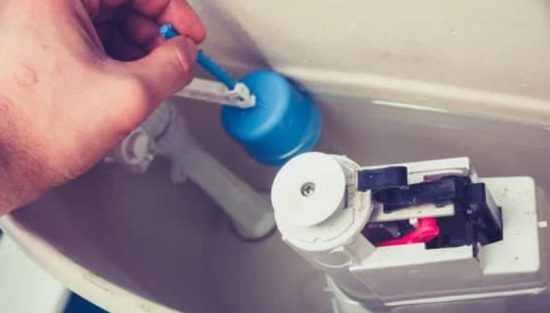
Step 4: Adjust the Fill Valve

Most contemporary fill valves have an adjustment mechanism to regulate the water level in the tank. Find the adjustment screw or knob, which is often located above the fill valve. This knob must be turned to lower the water level to approximately one inch below the overflow pipe to prevent overflows and guarantee optimal flushing. If the adjustment stops the water at the correct level, manually raise the float arm (if applicable).
If needed, check the water level each time you make a small change. This stage regulates the amount of water used for each flush, which is crucial for your toilet to work at its best. Precise adjustments might also improve water savings. Please give it a little trial and error to get the settings precisely correct. Ensuring the water stops at the appropriate level can help keep your toilet operating efficiently and avoid problems in the future.
Step 5: Test Your Installation
Watch the tank fill up when you replace the water supply valve after everything has been placed and adjusted. Ensure there are no leaks at any connection points as you watch the new fill valve in operation. Please verify that the water level stops where it should when the tank fills by looking at the level. If necessary, go back and complete the previous step. Ensure the fill valve fills the tank to the appropriate level by flushing the toilet multiple times. Keeping an eye on the flushing mechanism can assist in determining any imminent problems with the installation. Look for leaks near the base and the fill valve’s supply line connection point. If everything works as planned, your installation is successful. Testing thoroughly after installation ensures the system works under normal conditions and helps spot any initial problems.
How Much to Replace the Fill Valve of the Toilet?
The cost of replacing a toilet fill valve may differ depending on the model and brand of the valve you choose. Typically, a basic fill valve costs between $10 and $30. If you want to replace the fill valve yourself, you will save on labor costs. If you hire a professional, costs ranging from $50 to $150 will be lost. Opting for a more advanced or specialized valve can increase the material costs, potentially reaching up to $50 or more.
Additionally, if needed, it’s wise to factor in a few extra dollars for supplementary materials like plumber’s tape and potential tool rentals. However, the overall expense remains relatively low, making this a cost-effective DIY project. Completing this task yourself not only saves money but also equips you with valuable plumbing skills for future home maintenance.
Is professional assistance required or Not?
While most people can replace a toilet fill valve with a few tools and basic DIY abilities, there are some scenarios when you should hire a professional. You should probably call a plumber if you have complex plumbing problems, including an uncontrollable leaking faucet or a valve that does not fit. Professional assistance can also save blunders and extra expenses if you are uncomfortable handling plumbing fixtures.

Hiring a professional also guarantees that the work is completed promptly and correctly, which is especially crucial in houses with only one bathroom. Plumbers can also guarantee their work, giving customers peace of mind that any future difficulties will be repaired at no additional cost. Furthermore, a professional can identify any issues an unskilled eye would miss, preventing further crises. Finally, a professional’s knowledge is vital in negotiating these more difficult surroundings for those who live in older homes with obsolete plumbing systems.
Conclusion
Understanding how to replace a toilet fill valve is a necessary skill that can save you time and money. With the right tools and a bit of patience, most homeowners can perform this task on their own. However, feel free to call a professional if the situation seems out of your comfort zone. Remember, taking care of your plumbing fixtures improves their functionality and extends their lifespan, ensuring they serve you well for years to come.
FAQs on How to Replace Toilet Fill Valve
1. Can I use any fill valve for my toilet?
Most toilets are compatible with universal fill valves and are designed to fit many models. However, it’s essential to check the specifications of both your toilet and the fill valve to ensure compatibility. Some older or non-standard toilets may require specific types of valves.
2. Do I need special tools to replace a toilet fill valve?
An adjustable wrench and a plier are essential tools for this job. You may also need a sponge and towels to clean up spilled water. Plumber’s tape is recommended to ensure a tight seal on the connections.
3. Is it more cost-effective to DIY or hire a plumber for this task?
For those comfortable with basic DIY tasks, replacing a toilet fill valve can be more cost-effective than hiring a plumber. The savings are significant, considering professional fees can range between $50 and $150, while the valve and other materials usually cost under $40.
Related Articles: