
Did you know that over 60% of American homeowners have added an outdoor kitchen? This space has become a key feature for many backyards. It’s where they entertain and cook meals outside. You’ll learn everything you need to build your own outdoor kitchen. From planning to the last decorative touches, we’ve got you covered.
An outdoor kitchen adds more room to your home. It’s a special place where you can cook and enjoy meals outside. This guide will help you to know how to build an outdoor kitchen. It’s useful whether you want to do it yourself or hire help.
Key Takeaways
- Building an outdoor kitchen is a popular home improvement project that can transform your backyard into a functional and inviting entertaining space.
- This comprehensive guide covers the entire process, from planning and design to construction and finishing touches, to help you create the ultimate outdoor cooking and dining oasis.
- You’ll learn about the various skills, cost estimates, and time required for building an outdoor kitchen, as well as the benefits of having one, such as improved entertaining and healthier eating habits.
- The guide provides detailed step-by-step instructions on planning the layout, constructing the frame, and applying the stone or tile veneer to create a professional-looking outdoor kitchen.
- Decorating and furnishing your new outdoor kitchen with weatherproof patio furniture and accessories can help you create a cohesive and inviting backyard retreat.
Outdoor Kitchen Project Overview
Creating an outdoor kitchen can be a great DIY challenge. But, the needed skill level varies. It depends on your design. The basic parts are easy, but adding the stone can be hard.
Skill Level
This project’s difficulty is ranked at 3 out of 5. This means it needs some skill, especially if your design is complex. Different designs and materials change the needed skill level.
While the project’s difficulty is ranked at 3 out of 5, the actual complexity can increase significantly with intricate designs or luxury finishes. For those less experienced, it might be wise to start with a simpler setup or consider modular units that require less customization. Moreover, the choice of materials such as stainless steel versus stone can impact both the construction process and the level of expertise required.
Cost Estimate
Outdoor kitchens cost can vary. A simple island can be about $800. But, if you want high-end appliances and custom stonework, it can go over $10,000.
In addition to the basic and high-end cost ranges, the location and size of the outdoor kitchen also influence the total expense. Prices may also fluctuate based on regional costs for materials and labor. Furthermore, incorporating modern technologies or eco-friendly materials can further escalate the budget, offering long-term savings but higher upfront costs.
Time Required
You can finish your kitchen in two weekends if you’re skilled and have the right tools. But, it might take longer based on how complex it is and any issues you face. Delays are often inevitable, especially with custom projects that involve multiple vendors and weather dependencies.
Proper planning and contingency strategies can mitigate these delays. Additionally, the availability of pre-fabricated components can significantly reduce the overall timeline, providing a quicker route to enjoying your new outdoor space.
Benefits of an Outdoor Kitchen
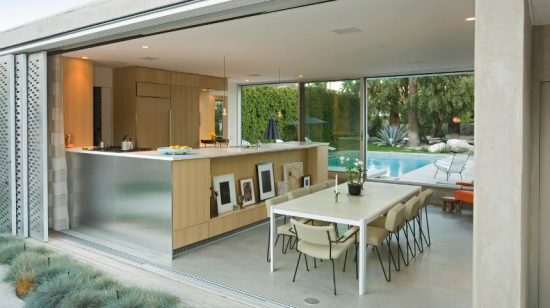
Outdoor kitchens are getting more popular. They offer a great space for fun with friends and family. With everything you need outside for cooking and dining, these spaces let you relax and eat together. This strengthens your bond with others.
Beyond social benefits, an outdoor kitchen enhances the functionality of your home by extending your living space outdoors. It can also increase property value, appealing to potential buyers as a desirable feature. Additionally, outdoor kitchens encourage a lifestyle shift, prompting more time spent in nature which can be beneficial for mental health.
Entertaining Guests
An outdoor kitchen can make your backyard a fun place to be. It’s perfect for making gatherings memorable. Being outside while cooking and eating creates a laid-back vibe. This leads to deeper talks and closer friendships.
With an outdoor kitchen, you can host a wider variety of events, from summer barbecues to elegant evening dinners under the stars. Adding features like a fire pit or outdoor lighting can enhance the ambiance, making your backyard an even more inviting space. Plus, the flexibility to cook and entertain in the same area encourages more interactive and engaging gatherings.
Promoting a Healthier Lifestyle
Planning Your Outdoor Kitchen
Where you put your outdoor kitchen matters a lot. Your choice affects how well it works and feels. A kitchen close to the house lets you easily use indoor things and store food. But, make sure it’s not too close to your house to avoid fires.
Putting it farther from the house can make the space more private and cozy. However, you might need to work more to set up utilities and protect it from the weather.
Measuring the Space
First, measure the space for your outdoor kitchen carefully. The size of your patio or deck will set the limits for your kitchen’s size. Think about the room needed for cooking, preparing food, and hanging out. Also, plan for any seats or dining spots you want. Ensure you consider the clearance space for opening cabinet doors and the space behind seating to allow easy movement around the area.
Additionally, factor in enough room for appliances like grills and refrigerators, which may need specific clearances for safety reasons, such as ventilation and heat dissipation. Lastly, don’t forget to accommodate for utilities such as water lines, gas pipes, and electrical outlets, which need to be planned and installed safely within the layout of your outdoor kitchen.
Choosing a Layout Configuration
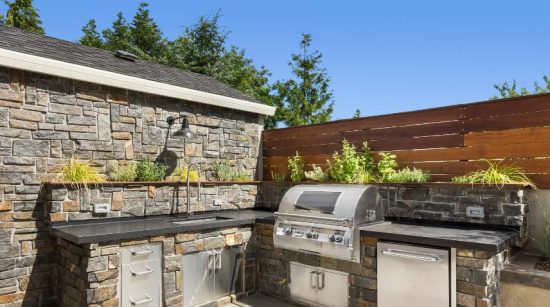
Your outdoor kitchen can take different shapes, like L-shaped or linear. The design depends on how much space you have and what you like. L-shaped and U-shaped layouts are good for bigger areas because they have lots of work and storage space.
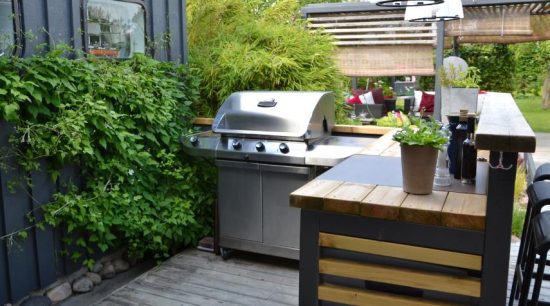
On the other hand, a linear layout is better for smaller spots. It’s more compact but still functional for cooking outside.
Outdoor Kitchen Zones
In the Prep Zone, adding a durable and easy-to-clean countertop like granite or stainless steel can provide a strong, weather-resistant work surface. Consider including built-in cutting boards or pull-out bins for waste to streamline food preparation tasks. Enhanced lighting, such as under-cabinet LEDs, can also improve visibility, making it easier to prep at any time of day.
Cooking Zone
In the Cooking Zone, it’s beneficial to integrate a variety of cooking appliances to diversify meal options, such as a built-in stovetop alongside the grill. Insulating jackets for built-in grills and other appliances can ensure safety by shielding combustible materials from heat. Additionally, overhead structures or canopies can provide shade and protection, making the cooking experience more comfortable and extending the usability of the area.
Plating and Serving Zone
For the Plating and Serving Zone, incorporating tiered storage and countertop spaces can facilitate better organization of dishes and utensils, speeding up the serving process. Adding pass-through windows or counter openings connected to the kitchen can ease the transfer of food from the cooking to the serving area. Moreover, installing ambient lighting or decorative elements can enhance the aesthetics of the space, creating a more inviting atmosphere for dining.
Entertainment Zone
Choosing between a DIY and prebuilt modular outdoor kitchen is key. Doing it yourself lets you make your kitchen exactly how you want it. But, it needs more building skills and time. Prebuilt kitchens are easier to set up but are limited in flexibility.
Your choice should consider your skills, budget, and how unique you want your kitchen to be.
| Feature | DIY Outdoor Kitchen | Prebuilt Modular Outdoor Kitchen |
|---|---|---|
| Customization | High | Low |
| Construction Difficulty | Moderate to Advanced | Easy |
| Time Investment | Significant | Minimal |
| Cost | Varies widely depending on materials and features | Generally more affordable |
| Flexibility in Size and Layout | High | Limited |
How to Build an Outdoor Kitchen from Scratch?
Starting to build, think about the utilities your kitchen will need. You might need electrical for fridges, wine coolers, or lights. Also, think about putting in plumbing for sinks or water access. And if you use gas, make a plan for a propane tank or gas line. Talking to experts, like electricians and plumbers, can make sure everything is done right.
Framing Options
Your kitchen’s frame can be made of wood, metal, or concrete blocks. Concrete blocks are strong and don’t burn. But, wood is easier for most people to work with. Using metal is like wood, but you need special tools.
Covering the Frame
After you build the frame, you need to cover it. Using cement board is good because it resists water and is ready for stone or tile. You can also use plywood if you cover it with something waterproof. But, with plywood you also have to put a wire mesh on before the next step.
Applying the Scratch Coat
The scratch coat is a layer of mortar put on the frame. It makes a rough surface for the stone or tile to stick to. This is an important step for making sure it holds well. After the scratch coat dries a bit, you make grooves in it for the stones or tiles to sit in.
How to Build an Outdoor Kitchen: A Step-by-Step Guide

Building the Frame
The first step in creating an outdoor kitchen is building its frame. Cut and assemble the posts, stretchers, and beams from pressure-treated lumber. Make sure the frame is a bit lower than the final height to fit the countertop. Use exterior screws to secure the frame and ensure it’s level.
When constructing the frame for your outdoor kitchen, ensure that all connections are tight and stable to support the weight of the countertops and appliances. Incorporating diagonal bracing can provide additional stability against lateral forces. It’s also important to plan for electrical and plumbing needs at this stage, incorporating conduits or piping within the frame structure before sealing it up.
Sheathing the Frame
Next, cover the frame with plywood or cement board sheathing. This layer is essential for adding the stone or tile veneer. Cut the sheathing to fit and attach it with adhesive and screws. Don’t forget to cut openings for cabinets or appliances.
When attaching the sheathing, ensure that all edges are flush and there are no gaps, to create a solid base for the veneer. For added durability, especially in variable weather conditions, consider applying a waterproof membrane over the sheathing before proceeding with the lath. This extra step helps prevent moisture penetration and prolong the life of the structure.
Attaching the Lath
After sheathing, you’ll need to secure wire lath with roofing nails. This adds a strong bond for the mortar and cladding. Install the lath with the wires facing up. Overlap lath pieces slightly for a smooth application.
Ensure that the lath is securely fastened, particularly around edges and corners, to prevent any loose areas that could affect the integrity of the veneer. It’s also important to check that the coverage is uniform to avoid weak spots in the mortar application. Covering the edges of the lath slightly with overlapping sections will ensure a continuous layer for the mortar to adhere to.
Troweling on a Scratch Coat
Applying a scratch coat is a critical step. Use a trowel to spread mortar over the lath. This coat should be about 1/2 inch thick. Let it cure for at least 24 hours.
Make sure the mortar is mixed to the right consistency—a balance between workable but not too wet, as this can affect curing time and adhesion. Use a straight edge or level to check the evenness of the scratch coat before it sets, making any necessary adjustments. This ensures a flat surface for easier and more secure veneer application.
Scoring the Mortar
After curing, score the mortar horizontally with a notched trowel. This creates guides for placing the stones or tiles. Scoring helps maintain a uniform and level surface.
Scoring deeper lines in areas that will bear more weight, such as under countertops or around appliances, can provide additional grip and support for the stone veneer. Ensure the lines are uniformly spaced to avoid irregular tile or stone placement. Clean any loose mortar from the scored lines to ensure a clean bonding surface.
Back-Buttering the Stone
“Back-butter” each stone by applying mortar to its backside. This ensures a strong attachment to the scratch coat. Score the mortar on the back of the stones to help with grip.
When back-buttering, use enough mortar to create a thick layer, but avoid over-application which can cause sliding or misalignment of the stones. Ensure the mortar is pressed into any crevices or irregularities on the stone’s back to enhance adhesion. Allow the mortar to become tacky for a few minutes before applying the stones to the wall, improving the initial grab.
Setting the First Course
Position the first stones at a corner, guided by a scrap board for alignment. Overlap the stones slightly as you press them in. Keep the surface level and remove excess mortar for a snug fit. This layer is the base for the rest.
Using a level after setting each stone is crucial to maintain a consistent alignment throughout the installation. Check the vertical and horizontal alignment with each new stone added to avoid gradual shifting that can accumulate into noticeable misalignment. Applying slight pressure uniformly across the stone will ensure better contact with the mortar.
Shaping and Trimming Stones
Adjust stones as needed to fit the pattern using a grinder with a diamond blade. Secure stones well before cutting.
Always wear safety glasses and dust protection when cutting stone to protect against flying debris and silica dust. Measure twice before cutting to minimize waste and ensure precision in the fit. Dampening the stones before cutting can reduce dust and extend the life of the diamond blade.
Completing the Stone Veneer
Continue stacking stones, alternating corner directions for a natural look. Aim for even mortar joints, and keep checking with a level for straight rows. Cover the entire frame with veneer following these steps.
Outdoor Decor and Furniture Ideas
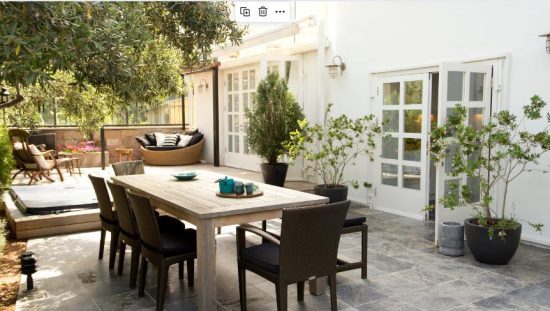
Consider adding stylish, weatherproof furniture to your outdoor kitchen. This furniture might include dining sets and lounge chairs. Opt for materials like stainless steel, aluminum, or durable wicker that can last against the weather.
Don’t forget to add shade with a pergola or a canopy. Such structures’ protect you from the sun and make the kitchen more enjoyable. You can also enhance the area with outdoor lighting, potted plants, and other decorations to seal the inviting look.
| Outdoor Furniture Item | Material | Weather Resistance | Durability |
|---|---|---|---|
| Dining Set | Aluminum | High | High |
| Lounge Chair | Weather-resistant Wicker | High | Moderate |
| Side Table | Stainless Steel | High | High |
FAQs on Building an Outdoor Kitchen
How to start with the design?
Begin by planning the layout and features you want, such as grills, sinks, and countertops, ensuring they fit your space and meet your cooking needs. Consider traffic flow and the relationship to the main house for ease of use and entertaining.
How to build with the right materials?
Choose durable, weather-resistant materials like stainless steel for appliances and natural stone or concrete for countertops and flooring, which can withstand outdoor conditions.
How to build with proper utilities?
Ensure access to necessary utilities such as water, electricity, and gas by planning their installation in advance, often requiring professional help to meet safety standards.
How to build on a budget?
To reduce costs, consider doing some work yourself, like constructing frames or installing finishes, and choose economical materials or repurpose items where possible.
How to build functional and aesthetic outdoor kitchen?
Integrate your outdoor kitchen with the surrounding landscape for a seamless look, and add features like lighting, seating, and shading to enhance functionality and aesthetics.