Tiling a shower can transform a bathroom from bare to beautiful, providing a custom look that adds value and appeal to your home. Whether restructuring an existing bathroom or starting from scratch, tiling a shower is a rewarding DIY project. This blog will give you information about how to tile a shower and ensure your shower tiling project succeeds, detailing everything from the walls to the floor and even the ceiling. Learn how to tile a shower to achieve professional results with a personal touch.
How to Tile a Shower Wall?
As the shower walls significantly impact the look and feel of your project, starting the restoration process with them is a conventional method. Before you begin, ensure your walls are spotless, dry, and even. It is essential to take care of any irregularities or blemishes on the surface because these can affect the tiles’ stability and alignment. In addition to making it easier to apply tiles, proper wall preparation increases the work’s long-term durability. Before you start tiling, be sure to fill all the gaps or cracks with the appropriate filler.
Measure and Plan
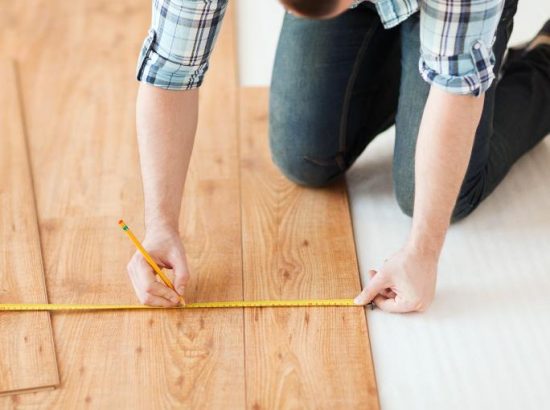
To determine the coverage area, start by measuring the size of your walls. A tile calculator can be handy for calculating the tiles required, cutting down on waste, and ensuring you get the correct number. Depending on the tiles’ size and the wall’s proportions, carefully consider your arrangement and decide whether to begin in the center or a corner. The size of the tiles and the pattern you want to make should be considered while planning since these will affect how you cut and fit the tiles around fixtures and corners. It’s also beneficial to use a planning program or app to see the finished wall if available.
Apply Adhesive
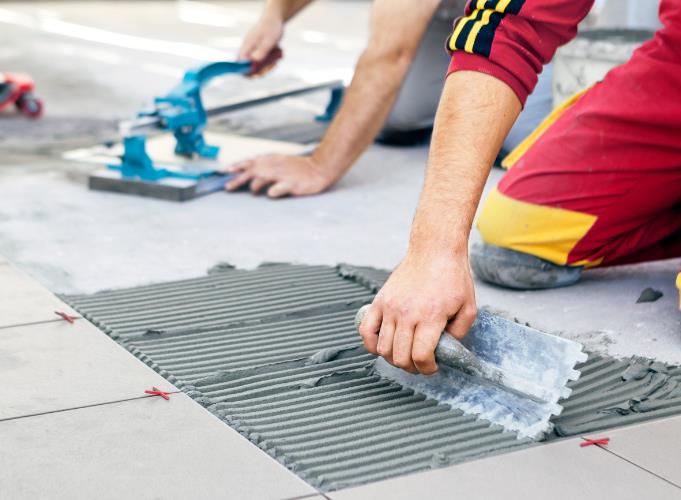
Choose a premium tile glue that works well with the tiles in your bathroom. Spread the adhesive evenly over the wall surface using a notched trowel; work in tiny pieces to keep the adhesive from drying out. The trowel’s notches aid in controlling the quantity of adhesive used, guaranteeing a uniform thickness that adequately supports the tiles. Apply the glue using the trowel’s flat side at a 45-degree angle to achieve a strong bond. For the final application, flip to the notched side. Moving steadily and consistently to prevent air pockets from forming beneath the tiles is best.
Set Tiles

Press the tiles firmly into the glue to begin setting, starting at your chosen spot. To guarantee uniform spaces between the tiles—essential for later grout application—use tile spacers. To ensure a consistent surface, use a level to check each tile as you go. Add tiles in a symmetrical sequence that works outward to improve the installation’s visual attractiveness. Measure and cut the tiles to fit as you get closer to the wall’s edges and corners. A tile cutter or wet saw can make precise cuts. It’s important to remember to leave a tiny space around the installation area’s margins for expansion. This space will eventually be filled with caulk to keep moisture out.
How to Tile a Shower Floor?
Shower floor tiling is essential for aesthetic appeal and functional integrity, especially regarding adequate drainage. Ensuring the floor is slightly angled toward the drain is critical to avoid water gathering, which can cause mold growth and water damage over time. It is crucial to thoroughly prepare the surface before starting the tile installation. As part of this preparation, ensure the floor is level and take any necessary precautions to preserve the underlying surfaces by waterproofing. Waterproofing is an essential step that guarantees the flooring’s longevity and safety.
To better control the slope toward the drain, using smaller tiles while placing the tiles is beneficial. Smaller tiles provide a more level and aesthetically acceptable surface since they adapt to the slope more easily. A notched shovel ensures a consistent thickness, and an evenly spread tile adhesive over the floor creates a level surface and firm bond. Spacers are used to maintain uniform gaps during the tile placement process—which is crucial for the eventual grouting procedure. Let the glue dry completely before grouting to guarantee that the tiles are firmly fastened and can withstand regular use without shifting.
How to Tile a Shower Ceiling?
Gravity creates particular difficulties when tiling a shower ceiling. However, it is a very effective way to keep mildew and moisture out of the space, making the bathroom more hygienic and durable overall. When preparing to tile the ceiling, choosing a high-quality adhesive is essential. The adhesive must be specifically made to withstand the weight of ceiling tiles and the downward pull of gravity. This ensures that the tiles will stay firmly in place over time.
Work in small parts to keep control during the tile-putting procedure. This makes it more likely that the adhesive and tiles will adhere correctly. Make sure that every tile is firmly pressed up against the ceiling. Hold each tile for a while to enable the adhesive to take hold. It’s crucial always to use a level to confirm the alignment before proceeding to the next tile. A homogeneous and aesthetically pleasant appearance is produced by placing the tiles equally.
Furthermore, maintaining uniform gaps between the tiles can be facilitated by using spacers. It’s essential to have uniform gaps when applying grout. Last but not least, after every tile is in place, give the adhesive enough time to dry. Start the grouting operation after the glue has dried.
Tools Required
The right tools are essential for a successful tiling job. Here’s what you’ll need:
- Tile cutter or saw
- Notched trowel
- Tile spacers
- Level
- Tape measure
- Sponge and bucket for cleanup
Gathering these tools beforehand will help streamline the process, ensuring everything you need is at hand when you start.
5 Steps to Tile a Shower
Tiling a shower involves careful planning and execution. Here are five key steps to guide you through the process:
- Preparation: The bathing space must be well prepared. First, thoroughly clean the surfaces to eliminate dust, debris, or residues. Verify that the surfaces are flat and dry. Eliminate any outdated paints, adhesives, or tiles. To avoid uneven tile installation, level the surface. To preserve the integrity of your installation, fix any fractures or holes. After applying a waterproof membrane, let it dry according to the manufacturer’s instructions.
- Planning: An excellent tiling project requires careful preparation. To calculate the number of tiles needed, measure the area and account for extras if any tiles are broken or cut. Do a dry layout to see the final plan and best put tiles around fixtures and corners. The design, especially at the edges and corners, strives for balance and symmetry. To guarantee alignment, use a laser level or chalk lines. To speed up the installation procedure, choose the tile design and direction in advance.
- Mixing Adhesive: A sturdy installation requires careful adhesive mixing. To ensure the right consistency, according to the manufacturer’s guidelines. For an even mix, use a drill and a mixing paddle. Let the mixture remain for a few minutes to activate the ingredients entirely if necessary. The suitable consistency ensures strong bonding and appropriate tile adherence. To prevent waste, only prepare as much adhesive as you can use in its working duration.
- Applying Tiles: Start applying tiles in the middle of a noticeable corner. Firmly press every tile into the glue. For the connection to be secure, slightly twist each tile. To maintain regular grout gaps, use spacers. Regularly check the alignment and level and make any required adjustments. To make cleanup easier, remove any extra glue as soon as possible. To prevent lippage, take into account a leveling method for larger tiles. Give the glue time to completely dry before adding grout.
- Grouting: Select a grout that goes well with your tiles and the area’s wetness level. Blend the grout until it has a uniform, paste-like texture. Ensure the grout covers the spaces completely by applying it diagonally with a rubber float. As you proceed, wipe out extra grout from tile surfaces. Before using a moist sponge to clean the grout, set it for approximately twenty minutes. Maintain the freshness of the cleaning solution. To waterproof the joints, use a grout sealant once the grout has set for a full day.
By following these steps, you can ensure that your shower looks great and is waterproof and durable. With the proper preparation and techniques, tiling a shower can be a straightforward DIY project that increases the beauty and functionality of your bathroom.
Conclusion
In conclusion, mastering how to tile a shower can be a rewarding DIY project. It requires careful planning, the right tools, and patience, but the result is a beautifully tiled shower you can be proud of. Whether tackling the walls, floor, or ceiling, these tips will help you achieve a professional-quality finish.
FAQs
What materials do I need to tile a shower?
Moisture-resistant tiles, such as ceramic, porcelain, or stone, are necessary. In addition, you’ll need a waterproofing membrane, tile glue, grout, tile spacers, a notched trowel, a level, and a tile cutter or saw. These supplies and equipment are essential for a sound installation that will guarantee the durability and functionality of your tiled shower.
How do I prepare the shower area for tiling?
First, thoroughly clean and dry the surface. Making the required corrections if the surface is not level is crucial. Any damage to the walls or floors must be fixed to give the tiles a strong base. Applying a waterproofing layer at the end will help prevent water damage, crucial in moist regions like showers.
What is the best type of tile for a shower?
Porcelain and ceramic tiles are ideal for shower rooms because of their longevity and resistance to moisture. Stone tiles have a distinctive and natural look, but they must be sealed to increase their resistance to moisture. Your tastes and the overall appearance of your bathroom will determine which tile type is best for you.
How do I ensure my tiles are evenly placed?
Check the tile alignment frequently with a level. Tile spacers are essential to maintain uniformity in the appearance of the gaps between tiles. To obtain the best visual symmetry and fit, it is ideal to begin placing tiles from a central point or important focal region and work your way outward.