How to Snake a Toilet for Overflow and Clog?
Introduction: What is Snaking a Toilet?
A helpful method to clear clogs that result in water overflow and slow drainage is to snake your toilet. This method needs a plumbing snake, a flexible auger that can go deep inside the plumbing system to remove blockages that plungers can’t reach. A clogged toilet can become a significant domestic issue, compromising your home’s hygienic conditions and functionality. Taking care of these problems immediately is critical to stopping water damage and keeping the toilet tidy and functional. This procedure works very well when using standard methods to remove complex obstructions further down the line. Possessing how to snake a toilet can prevent expensive repairs by saving money and time by offering a do-it-yourself alternative.
When We Need to Snake a Toilet?
If your toilet continues clogging and a plunger isn’t working, it’s time to snake it. Indications of a severe obstruction include water rising and spilling over the toilet bowl’s edge, gurgling sounds coming from the plumbing, and water backing up in the bowl rather than emptying. Flushed things that don’t break down quickly, including sanitary goods, thick toilet paper, or even kid’s toys, often cause these jams.
Snaking becomes required when these blockages build up in the plumbing system and are not easily removed by more straightforward methods. The failure of these initial attempts highlights the necessity of a more involved solution, such as snaking. Moreover, foul smells from the toilet could indicate that waste gases are seeping back into the house due to a clog. Finally, if multiple flushes consistently fail to clear the bowl, this is another clear signal that snaking the toilet is required to tackle the deeper, more stubborn obstructions effectively.
Tools Required to Snake a Toilet
- Closet Auger
- Rubber Gloves
- Bucket
- Flashlight
- Sponge or Mop
How to Snake a Toilet?
1. Preparing the Toilet
Ensure the toilet bowl’s water level is low enough before beginning the snaking. Elevated water levels can create an extra mess. Use a small container or sponge to remove extra water and discard it into a bathtub or sink to lessen the water. This procedure reduces the possibility of splattering unclean water while preparing the area.
Maintaining the work surface as dry as possible is crucial to avoiding slippage and improving drain visibility. Towels or newspapers placed around the toilet’s base can also help absorb spillage and maintain a clean floor. Verify that no small tools or parts near the toilet could accidentally fall in during the procedure. Finally, wearing old clothing or an apron is advisable as this task can get messy, protecting your garments from stains or splashes.
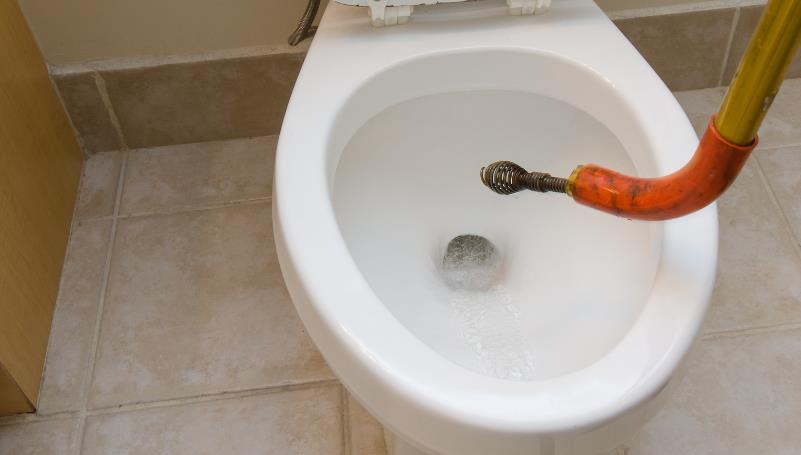
2. Inserting the Auger
After preparing the toilet, place the closet auger’s curved tip inside the bowl, making sure it points straight down the drain. The drill’s sleeve must touch the bowl’s surface to avoid scratching the porcelain. With a tight grip on the drill’s handle, gently but firmly push the cable into the drain with enough pressure. The first insertion is essential because it creates the pathway to deeper blockages. Ensure the drill is positioned correctly to prevent harm to the toilet’s internal trap or waste output.
As you push the cable, maintain a steady and controlled pressure to ensure smooth entry without forcing the auger too abruptly, which could cause jams or bends in the cable. It’s helpful to keep the drill as straight as possible as you insert it to avoid unnecessary wear on the cable. Align the auger handle and cable in a way that gives you leverage, which will aid in easier manipulation as you begin to encounter resistance from the clog.
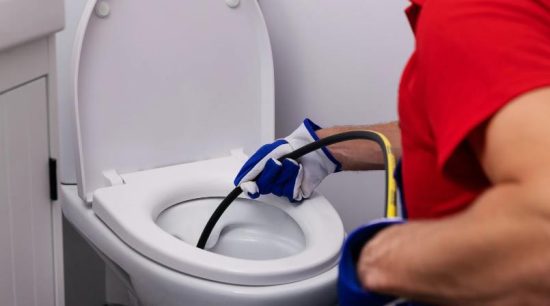
3. Navigating the Bend
Start rotating the handle clockwise as you push the drill farther down the drain. This allows the auger to move forward without becoming entangled in the toilet’s complex piping system. Circling the toilet trap in a clockwise direction facilitates navigating its bends and S-curves, which are frequent locations for clogs to build up. Maintain a constant and steady action to ensure the auger passes through these challenging spots smoothly.
Listen for changes in the sound of the drill; a smoother sound usually indicates that the drill is going freely, whereas grinding or increased resistance may indicate that you are approaching or engaging with a clog. To prevent the drill from getting stuck, loosen it up before turning the handle again if resistance increases noticeably. To control the drill’s direction and efficacy, carefully rotate it with a firm but mild effort. The drill can also be gradually unclogged by making small, frequent withdrawals and reinsertions, enabling the drill to go further into the plumbing with each pass.
4. Detecting the Blockage
Continue feeding the drill deeper into the pipes until you encounter severe resistance. Usually, this resistance indicates that the drill has reached the blockage. At this stage, it’s critical to keep applying constant pressure to the drill to keep it in contact with the obstacle. A slight pressure and rotational adjustment can ensure the auger tip is positioned correctly to clear the obstruction.
As you find resistance, don’t push the auger too hard, which could drive the blockage deeper down the pipe or damage the piping. Rather, gradually increase the rotational movement to enable the auger to clear the obstruction efficiently. If the resistance decreases briefly but then returns, it could suggest that the clog is breaking up or moving. Keep a close eye on how the cable feels; an immediate release of tension usually indicates that the obstacle has been successfully penetrated or dislodged.
5. Dislodging the Clog
You are increasing the handle’s rotational force once the obstruction has been confirmed to be in contact. This sharp rotating motion is intended to split the clog or hook into the substance, making removal possible. The amount of force needed for this phase may vary depending on how thick the obstruction is.
To remove the clog, you must exert adequate pressure, but you must be careful not to use too much power as this could harm the plumbing. Pay attention to variations in the auger’s movement as you increase the rotational force; these may be signs that the blockage is beginning to fracture. Turn the handle in forceful, deliberate strokes to optimize the coil’s effectiveness in holding or fragmenting the blockage.
It’s helpful to occasionally pull the auger slightly back towards you and then push forward while turning, as this can help hook or segment the obstruction more effectively. If the resistance decreases significantly and water begins to drain, this usually means the clog has been successfully dislodged or sufficiently reduced to restore flow.
6. Removing the Clog
Flush the toilet to see whether the debris clears and if the auger broke up the clog. Pull the cable out slowly, ensuring the blockage emerges if the auger has hooked the clog. This phase could get messy, so have a bucket ready to catch any spills. Carefully remove the auger to ensure that the obstruction is completely removed and that no pieces remain in the pipes.
During this process, keep the bucket close to catch any spillover and ensure all waste is contained. If the blockage does not come out on the first attempt, reinsert the auger and repeat the snaking process to ensure thorough removal. As you remove the auger, clean off any debris under running water before it dries, as this can make subsequent cleaning more difficult. Finally, inspect the toilet for any signs of damage or leaks that might have occurred during the process, ensuring everything is intact and functioning correctly.
7. Repeating the Process`
If the toilet does not drain correctly after the initial try, snaking might be required again. This guarantees that every area of the obstruction has been cleared. Large or stubborn obstructions may require several passes. Every repetition ensures that the pipe is thoroughly cleaned and that flow is restored. After each effort, it ran a little water, so it is reasonable to observe if the flow has improved. This can help determine how effective the snaking was.
Be patient and methodical with each pass, adjusting the technique slightly—such as altering the penetration depth or angle—to effectively target any remaining clog segments. It’s important not to rush the process, as hurried attempts can miss parts of the clog or cause damage to the plumbing. Lastly, keep track of how often you’ve snaked the toilet; if the problem persists after several tries, it may indicate a more severe issue requiring professional help.
8. Final Checks and Cleanup
Once the blockage has been successfully removed, flush the toilet one last time to ensure everything works properly. This is a crucial step in ensuring that your snaking is working. After verification, wash the drill with water and an appropriate disinfectant to remove leftovers. To avoid rust, make sure the drill is dry and stored correctly.
To ensure safety and hygiene, clean the area around the toilet. Wipe down the toilet and any surfaces that may have been in contact with water splashes or debris with a disinfecting cleaner. To prevent the growth of bacteria, ensure all instruments and cleaning cloths are thoroughly cleaned and dried before being stored. Lastly, wash the bucket with a disinfectant solution to get rid of any leftover dirt or bacteria, and dispose of any waste collected in it cleanly. By thoroughly cleaning the space, you can guarantee it stays safe, hygienic, and ready for frequent use.
Conclusion
Snaking a toilet is an effective method to clear most blockages, restoring full functionality to your bathroom. Homeowners can independently resolve many common plumbing issues by meticulously following the detailed steps provided. Regular maintenance and prompt attention to emerging problems are crucial in preventing severe blockages that can be expensive to repair. However, if your efforts do not resolve the issue, seeking professional help is advisable to ensure your plumbing system remains in optimal condition. Remember, maintaining your plumbing is not just about fixing problems as they occur; it’s about ensuring long-term reliability and efficiency. If you ever feel uncertain or the problem persists, professional plumbers are just a call away, ready to assist with their expertise.
FAQ on how to snake a toilet
What is a plumbing snake?
A plumbing snake or auger is a tool that used to clear blockages deep within the plumbing pipes of a toilet. It is a long, flexible metal cable with a handle on one end and a corkscrew-like coil on the other, designed to dislodge clogs.
When should I use a plumbing snake?
Consider using a plumbing snake when more straightforward methods, like a plunger, fail to clear the blockage. Signs that you need to snake your toilet include water backing up in the bowl, persistent clogging, and unusual gurgling noises from the drain.
How do I use a closet auger to clear a toilet clog?
Insert the curved tip of the closet auger into the toilet bowl, aiming directly at the drain. Push the cable down while turning the handle clockwise to navigate through the plumbing bends and reach the clog. Once you encounter resistance, increase your turning force to break apart, hook the clog, and pull it out.
What are some tips for successfully snaking a toilet?
- Always wear rubber gloves to maintain hygiene.
- Keep the auger’s sleeve in contact with the toilet to avoid scratches.
- Apply steady pressure and rotate the handle slowly to avoid damaging your plumbing.
- Consider calling a professional if the clog doesn’t clear after several attempts.
Can snaking a toilet damage the plumbing?
If done correctly, snaking should not damage your plumbing. However, excessive force or improper use of the auger can scratch the bowl’s porcelain or harm the pipes. Always follow the manufacturer’s instructions and use the tool as intended.