Have you ever been frustrated by a kitchen sink that won’t drain? Or maybe you noticed your garbage disposal isn’t working as it should. It can be a real hassle for homeowners. But, taking care of a broken or acting-up disposal doesn’t need to be stressful. This guide will show you how to remove garbage disposal. Plus, how to put in a new garbage disposal, if that’s what you decide.
You’ll finish reading this with all the info and confidence needed. You’ll handle this job like a true professional.
Key Takeaways
- Safely disconnect the power supply and plumbing connections before attempting to remove the garbage disposal.
- Gather the necessary tools, including pliers, screwdrivers, and a new disposal unit if replacing.
- Carefully detach the disposal from the mounting ring and support it as you remove it.
- Disconnect the electrical wiring and cap the exposed ends to ensure safety.
- Properly dispose of the old disposal unit and clean the sink opening before installing a new one.
Preparation for Removing the Garbage Disposal
Removing your garbage disposal requires some preparation to ensure safety and efficiency. Start by gathering all necessary tools and securing a clean, unobstructed workspace. Ensure the area is well-lit, and wear safety goggles to protect your eyes. Double-check that all the parts and tools are listed in your disposal’s installation manual, as specific models may require specific tools.
Gather the Necessary Tools
With pliers, a flat and Philips screwdriver, and a wrenchette, consider having some plumber’s putty and a flashlight handy. Tape measures and a level might be needed to ensure everything fits perfectly with a new installation. Keep a few extra screws and fittings available in case you find damaged parts during the disassembly. Labeling or taking photos of the setup before disassembly can help with reinstallation or in case you need to troubleshoot.
Shut Off the Power Supply

After shutting off the power at the circuit breaker, affix a note or a tape over the switch to avoid someone from accidentally turning it back on while you work. Confirm zero electrical current with a non-contact voltage tester before you touch any wires. It’s also wise to double-check the disposal plug under the sink to ensure it is unplugged. Documenting which circuit controls the disposal can be helpful for future reference.
Clear the Workspace
Lay down a protective sheet or towels to catch any spills or debris, protecting your cabinetry and flooring. It’s also a good idea to keep a flashlight or a portable lamp nearby, as cabinet spaces can be dim. Organize your tools within arm’s reach but out of the way to maintain a clear working area. Consider having an assistant or a support stand to help hold the disposal unit as you detach it, as they can be heavy.
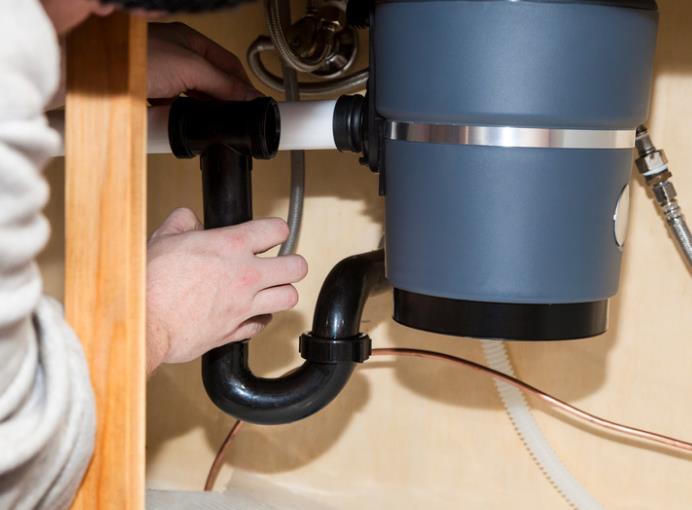
Disconnecting the Drain Pipes and Hoses
Before starting, take pictures of the connections for reference when reconnecting them or if troubleshooting is needed later. Label each component as you disconnect them to ensure a hassle-free reinstallation. Check for any wear or damage on the pipes and hoses; now is an excellent time to replace them if necessary. Ease the hoses and pipes off gently to prevent connection points or neighboring plumbing damage.
Remove the Dishwasher Drain Hose
Secure the hose with a clamp or tie to prevent it from whipping or leaking once disconnected. If the hose is brittle or damaged, consider replacing it as part of the disposal removal process. Apply gentle pressure when removing the hose to avoid damaging the disposal’s nipple connection. Clean the hose end and the nipple before reconnecting them to prevent leaks in the future.
Disconnect the P-Trap
After loosening the nuts, inspect them and the washers for wear. Consider replacing them if they show deterioration. Gently wiggle the P-trap free to avoid stressing the adjacent plumbing. Clean the P-trap inside and out before reinstalling it, as buildup can cause clogs and odors. If the P-trap is old or made of metal, consider upgrading to a PVC P-trap, which is easier to remove and maintain.
Prepare a Bucket for Water Drainage
Choose a bucket that fits comfortably under the pipes to catch the maximum amount of water without needing frequent emptying. If you expect a lot of water, have a second bucket handy to swap in quickly. Position the bucket directly under the connections to minimize spillage and water damage. After the project, responsibly dispose of or reuse the water collected, if possible, for gardening or other suitable needs.
Removing the Garbage Disposal Unit
To start, find the round hook openings on the unit’s mounting assembly. These help hold the garbage disposal in place. Next, use a tool like a hex key or a screwdriver to turn the hooks. Turn them counterclockwise to loosen the disposal. Once it’s loose, you can use your hands to take it off. Remember, the disposal is heavy. So, make sure you’re ready to support it when it comes off.
- Detach the Disposal from the Mounting Ring; After you find and turn the hook openings, you can start taking off the garbage disposal. Turning these hooks lets you unscrew and lift the disposal out of the sink.
- Support the Disposal Unit; Ensure to hold up the garbage disposal as you take it out. These units are heavy. A good grip and support will keep you safe and avoid damage.
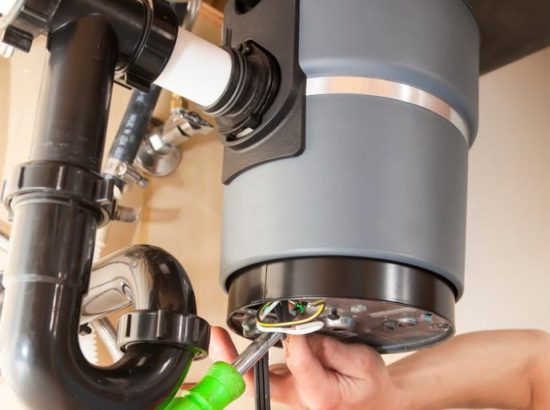
Disconnecting the Electrical Wiring
After taking off the garbage disposal, you need to deal with the electric connections next. Safety is key here. Start by spotting the plate that covers the wire connections. It’s found at the bottom of the disposal.
- Locate the Wiring Connections; Get a screwdriver and remove the plate. This uncovers the wires you need to disconnect.
- Disconnect the Wires and Cap Them; Then, untwist the wire nuts to free the wires. Remember to organize the wires well. You’ll place caps on them in a bit. And after disconnecting, use new wire nuts to cover the ends safely.
How to Remove Garbage Disposal?
Removing a garbage disposal is quite simple if you have the right tools and follow the correct steps. First, make sure to turn off the power at the breaker box. This is important for your safety. Then, remove the dishwasher drain hose and the P-trap. Make sure to drain the water into a bucket below.
After the pipes are off, take off the disposal from the mounting ring. You can do this by turning the hook openings with a tool like a hex key or a screwdriver. Just turn them counterclockwise until you can take the disposal off. Don’t forget to hold the disposal because it’s heavy.
Now, with the disposal out, you’ll need to get rid of the wires. To do this, take off the cover plate and carefully disconnect the wires. Cover them afterwards for safety. This process readies you for either putting in a new disposal unit or not using it anymore.
Removing the Mounting Assembly
If you’re not installing a new garbage disposal but taking your old one out, you must take off the mounting assembly. It’s a few steps but not too hard.
- Assess the Need for Removal; Look closely at the sink and its parts. If you’re just putting in a new disposal, you might not need to take the current assembly off. But if you’re getting rid of it, you’ll have to take out the whole thing.
- Loosen the Mounting Screws; Find the three screws that keep the mounting assembly in place. Use a screwdriver to unscrew and remove them. This step starts the dismantling process.
- Clean the Sink Opening; After removing the assembly, pull out the sink sleeve, flange, and gasket. Then, clean the area well. Get rid of any old putty or dirt. This way, you’re ready for what’s next.
Replacing the Garbage Disposal
When you’re swapping out the garbage disposal for a new one, do it step by step. First, attach the rubber seal underneath the new disposal’s drain flange. Then, slide it into the sink’s drain hole. Next, add another seal and secure it with a metal backup ring under the sink.
- Install the New Mounting Ring; If the old mounting ring isn’t good anymore, add a new one. Use three screws to loosely fix it before using a snap ring to secure it.
- Connect the New Disposal Unit; Then, carefully lift and turn the new disposal into the mounting ring. Twist it until it’s locked securely in place.
- Reconnect the Drain Pipes and Hoses; With the disposal unit in place, you’re almost done. Reconnect the drain pipes and hoses. Make sure to reattach the dishwasher drain hose and the p-trap for proper drainage.
Garbage Disposal Maintenance and Troubleshooting
It’s key to keep your garbage disposal working well for a smooth kitchen. You should clean it often to avoid big problems later and save money. This guide will show you how to maintain your garbage disposal and fix common issues.
Regular Cleaning and Care
Running your garbage disposal frequently with hot water and a bit of dish soap is a good practice. This action helps clean out any leftover food or dirt. You should also toss in citrus peels or ice cubes from time to time. Doing this keeps the blades sharp and the unit clean.
Unclogging Techniques
Is your garbage disposal clogged? Don’t worry; there are ways to fix it. First, turn it off and look inside for any big blockages. You can use tongs or pliers to carefully remove these items. If it’s still clogged, use a plunger gently. Finally, if nothing else works, you might have to disassemble it for a deep clean.
Identifying Common Issues
Gabage disposals are usually dependable. But, they can have leaks, make too much noise, or stop working. If you see these signs, it might be time for a check-up or a new disposal. Usually, they last about 12 years. So, watch out for any damage or problems.
Safety Precautions for Disposal Removal
When taking out a garbage disposal, safety is super important. Precautions reduce the chance of accidents and make the removal go smoothly.
- Wear Protective Gear; It’s always smart to wear gloves when handling a garbage disposal. Gloves protect your hands from sharp edges and cuts. Also, safety glasses keep your eyes safe from debris or water.
- Follow Electrical Safety Guidelines; The key step is turning off the power safely. Don’t forget to switch off the circuit breaker or unplug the disposal. Checking with a voltage detector ensures the power is really off.
- Secure the Work Area; Make sure the cabinet space under the sink is clear before starting. Remove items that could get in the way to prevent damage or accidents. Place a bucket or towels below the disposal to catch any splashing water or debris.
Conclusion
In conclusion, removing a garbage disposal needs a lot of thought and careful steps. By using the steps we talked about, you can take out your old unit safely. This is whether you’re getting a new one or not using it anymore.
You start by turning off the power and taking off the drain pipes. Then, you move on to take out the disposal itself and deal with the wires. Safety is key here. Always wear the right gear, follow the rules for electricity, and keep your working area safe.
With the right tools and a clear plan, you’ll manage to get rid of the garbage disposal. Doing so makes setting up a new one or cleaning the area easier. By taking care of your disposal unit and fixing problems early, you’ll make it last longer. This way, you’ll keep enjoying the ease it brings to your kitchen.
FAQs on Removing Garbage Disposal
What is the first step in removing a garbage disposal?
The top priority is to cut off the disposal’s power at the circuit breaker. This ensures safety for your work ahead.
How to Remove Garbage Disposal from Flange?
To remove a garbage disposal from the flange, first ensure the power supply is disconnected and all plumbing connections are detached. Support the disposal unit with one hand while using the other to twist the mounting ring counterclockwise; this will release the disposal from the mounting flange. Once loose, gently lower the disposal away from the sink, taking care not to damage the flange or sink surface.
How to Remove Garbage Disposal to clean?
To remove a garbage disposal for cleaning, first disconnect the power by unplugging the unit or turning off the circuit breaker. Next, detach the drain pipe and any dishwasher hose connected to the disposal, placing a bucket underneath to catch any water that spills. Finally, twist off the mounting ring that secures the disposal to the sink flange, and carefully lower the disposal unit to access it for thorough cleaning.