
Every homeowner faces a time when their kitchen needs a fix. It’s about more than tools and recipes; it’s about an important hidden appliance. You might hear it slow down or stop working. Or perhaps you’re inspired to beautify your kitchen. Learning how to replace a garbage disposal is key. It’s a task that feels like a mission. And I’m here to show you, based on my own DIY experience, how easy it really is. This journey offers a chance to feel empowered and save money at the same time.
Swapping out your garbage disposal is more than pipes and wires. It’s a lesson in independence. I faced this challenge when my disposal went quiet, sparking a hands-on fix. With the right advice and mindset, you can do it, too. I’ll guide you through transforming doubt into victory. You’ll make your kitchen’s reliable helper work like new again.
Preparing for Your Garbage Disposal Replacement
Before you start to replace your garbage disposal, it’s key to get everything ready. I’ve put together some tips to help with this switch. They cover picking the right model and organizing your tools. This helps make the process easy, even for those new to DIY.
Start by looking at your current garbage disposal. It’s important to know its size, style, and brand. This makes picking a new one that fits right crucial. Choosing the right unit reduces the need to change your plumbing or countertops. This keeps the installation simple. After choosing, it’s time to get the tools you need. A wrench, plumber’s putty, a bucket, and safety goggles are a must. These protect you from accidents.
Don’t forget about preparing the space for work. Clear out the area below your sink for easy access. This helps avoid water damage and losing tools. Making sure everything is organized and in reach is vital. A well-prepared workspace speeds up the job and makes it successful.
By following these steps, you’ll be ready for your garbage disposal replacement. Feeling prepared boosts your confidence. It makes the task go smoothly and quickly.
Assessing Your Current Garbage Disposal Setup
Before putting in a new garbage disposal, you need to check your current setup. It’s important to make sure they’ll work together well. This step is key in avoiding hassles and picking the right model for an easy upgrade.
- Identifying the Type and Model You Have
First, I checked the current waste disposal to determine its brand and model. You can usually find this information on a sticker on the unit. Understanding your system’s details is vital. It helps you choose the correct replacement and decide what you’ll need from a new unit. Take a picture or jot down the serial number, which can be helpful if you need to contact customer support. Verify the horsepower and other specifications, which will guide you to a compatible upgrade. Additionally, look up any reviews or recalls for your current model to ensure no ongoing issues might affect your choice.
- Understanding the Hookups and Connections
Next, I check how the waste disposer is hooked to electricity and plumbing. I look at the connections closely. It’s important to know this. If the new unit doesn’t match, it might need extra work or expert help to fit it correctly. Note the type of switch used (wall switch or air switch) and its location relative to the sink. Examine the pipe configuration to ensure the new unit can align with the existing setup. Also, check for the presence of a dishwasher drain connection, which not all disposals accommodate.
- Determining the Need for Upgrades or Accessories
Finally, I consider if any upgrades or extras are needed. This might mean needing better mounts, an advanced switch, or new plumbing parts for a stronger unit. Thinking about these additions early on paves the way for an easier and better functioning setup.
How to Replace a Garbage Disposal?
Replacing a broken garbage disposal is not so hard. It takes some basic tools and a bit of planning. Soon enough, you’ll see it’s something anyone can do. I’ll walk you through the whole thing, step by step. By the end, you’ll be ready and confident to tackle your disposal replacement.
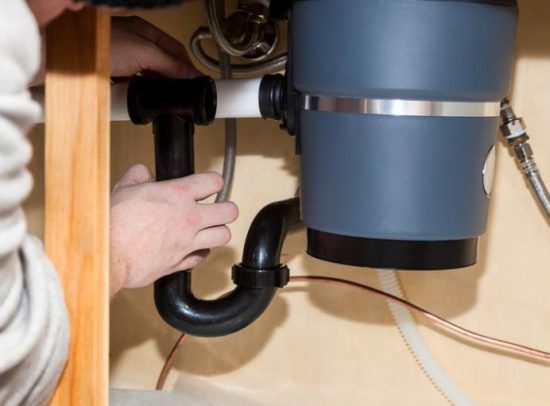
- Disconnecting the Power and Plumbing
First up, safety first. Turn off the power to your garbage disposal. You can unplug it or turn off the breaker. After that, disconnect the drain pipe and any dishwasher connections. Have a bucket ready to catch any water and prevent a mess. Make sure to disconnect the P-trap and other plumbing lines connected to the disposal. Check for any leaks or damage to the plumbing that may need attention before installing a new unit. Ensure all connections are fully detached and that any debris from the area is precise.
- Removing the Old Disposal Unit
Now, let’s get the old one out. Start by loosening the mount and removing the old unit. Be careful, and don’t let it just drop. You don’t want to cause any damage under the sink. Once the unit is detached, carefully set it aside in a stable area that won’t tip over. Inspect the mounting assembly for any wear or damage that could affect the installation of the new disposal. Clean the mounting area thoroughly to make sure a good seal when installing the new unit.
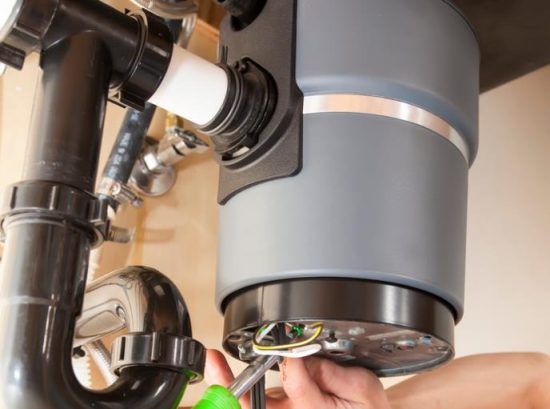
- Installing the New Garbage Disposal
Time to put the new one in. First, attach the mounting ring under the sink securely. Then, connect the new disposal. Make sure all seals are good to stop leaks. After placing the disposal, reconnect the plumbing and power. Always test it to make sure it works well before finishing up.
Just follow these simple steps to replace a garbage disposal. Doing this will make your kitchen work smoothly again in no time.
Garbage Disposal Replacement Tips and Troubleshooting
Thinking about getting a new garbage disposal? It’s crucial to get the installation right. I’ll guide you through key steps. This will ensure it’s not only leak-proof but also works well. Troubleshooting common problems is also part of our journey. By the end, you’ll know how to check if your new disposal is working as it should.
Ensuring a Secure and Leak-proof Installation
A good fit is critical to preventing leaks when changing a garbage disposal. First, use the plumber’s putty under the sink flange. Before you tighten everything, use the correct parts for your model. Follow the manufacturer’s instructions closely.
A little extra effort now can prevent future hassles. Double-check that the mounting ring is securely fastened to avoid vibrations that could loosen the seal. After installation, wipe down the area to remove any excess putty or debris. Lastly, it’s crucial to ensure all gaskets and seals are correctly positioned and intact to prevent potential leaks.
Dealing with Common Issues During Replacement
Replacing a disposal might bring up issues like wiring or fitting problems. Ensure you pick the correct parts for your disposal for a proper sit. If wiring is the issue, match your new disposal’s needs with your home’s wiring setup. A troubleshooting guide could be a lifesaver.
It helps you take essential steps. If the new disposal is heavier or configured differently than the old one, ensure the support brackets are adequate. Additionally, always disconnect power before attempting any electrical work to ensure safety. Consider hiring a professional if the installation becomes too complex or local codes require it.
Testing the New Unit’s Functionality
After installing your garbage disposal, testing is a crucial step. Start by turning on the cold water and then the disposal. Listen for any unusual or weird sounds and watch for leaks. If something doesn’t seem right, our guide can help you troubleshoot and fix it. This step is essential to ensure that your disposal is not only installed but also functioning properly. It’s also important to check that the disposal grinds effectively without hesitation or jamming. Running the disposal with ice can help clean the blades and ensure smooth operation. Lastly, confirm that the reset button functions correctly and that there are no electrical faults indicated by unusual noises or tripped breakers.
Conclusion
As we near the end of this guide, I hope it’s helped you feel ready to replace your garbage disposal. We’ve covered all the important steps. From preparing your area to picking the right model, and from uninstalling the old one to setting up the new.
Success in any DIY project comes from getting ready and knowing your tasks. By planning well and following the steps we discussed, you’re more likely to succeed. This approach helps you avoid problems and makes your new disposal last longer. Remember, taking it step by step is key.
Ending this guide, I aim to leave you confident about changing a disposal unit. We’ve talked about plumbing and safety around electricity. Now, installing a new disposal doesn’t seem as hard, right? By carefully following our advice, your kitchen will soon run smoother and you’ll feel proud of achieving this. So, get ready to enjoy your new kitchen helper. Good luck, and wear your DIY badge proudly!
FAQs on Replacing Garbage Disposal
How can I tell if I need to replace my garbage disposal?
A garbage disposal might need replacing if it gets clogged often, performs poorly, smells bad, leaks, or won’t start. Odd noises and water under the sink are also bad signs. These mean you might need a new one.
Do I need a plumber to replace my garbage disposal?
If you’re good with tools and instructions, replacing a disposal can be a DIY project. But, for safety or if local laws say so, a plumber is the better choice.
What tools will I need to replace my garbage disposal?
You’ll need tools like a hammer, screwdrivers, and plumber’s putty. Also, a pipe wrench and a hacksaw. Depending on your unit, a disposal wrench, voltage tester, and plumber’s snake might also be needed.
How do I choose the right replacement garbage disposal?
Look for a disposal with the right power, chamber size, and noise level for your kitchen. Choose a well-known brand. Make sure the new one fits your sink and can work with your dishwasher smoothly.
How do I know if my new garbage disposal is compatible with my sink?
Make sure it fits your sink’s standard 3.5-inch drain opening. Compare the new disposal’s specs with your sink’s to be sure. If you’re unsure, ask the manufacturer or a plumber for help.