Adding a frame to a mirror is a simple and budget-friendly DIY project that can instantly transform the look and feel of any room. Whether you have a plain builder-grade mirror or a frameless one, this step-by-step guide will walk you through the process of framing a mirror from start to finish.
From planning and preparation to the final touches, you’ll discover everything you need to know to create a beautifully framed mirror that matches your style and decor. So, why settle for a boring mirror when you can turn it into a stunning focal point?
In this guide, we’ll cover each step in detail, including how to choose the right frame style, measure and cut trim, apply adhesive, and secure the frame to the mirror. You’ll also learn tips and techniques for customizing the frame design, selecting the appropriate adhesive, and adding the finishing touches for a professional look.
Whether you’re a beginner or an experienced DIY enthusiast, this guide will empower you to learn how to frame a mirror with our step-by-step guide. Discover tools, materials, and techniques to create a beautiful, custom-framed mirror for your home. And enhances the aesthetic of your space. So, are you ready to take your mirror from bland to beautiful? Let’s get started!
Introduction to DIY Mirror Framing
When it comes to enhancing the aesthetic appeal of your home, framing a mirror can make a significant difference. Not only does it add a touch of elegance to any space, but it also allows you to showcase your creativity and personal style. In this section, we will explore the benefits of DIY mirror framing and why it’s a popular choice among homeowners.
DIY mirror framing gives you the opportunity to customize the look of your mirror according to your preferences. You can choose from a wide range of frame styles, colors, and materials to create a mirror that complements your existing decor. Whether you prefer a modern and sleek design or a rustic and vintage-inspired frame, the possibilities are endless.
One of the biggest advantages of DIY mirror framing is the cost savings. Purchasing a framed mirror can be quite expensive, especially if you’re looking for a unique or custom-made design. By framing a mirror yourself, you can achieve the same stylish look at a fraction of the cost. This budget-friendly option allows you to invest in other home improvement projects without breaking the bank.
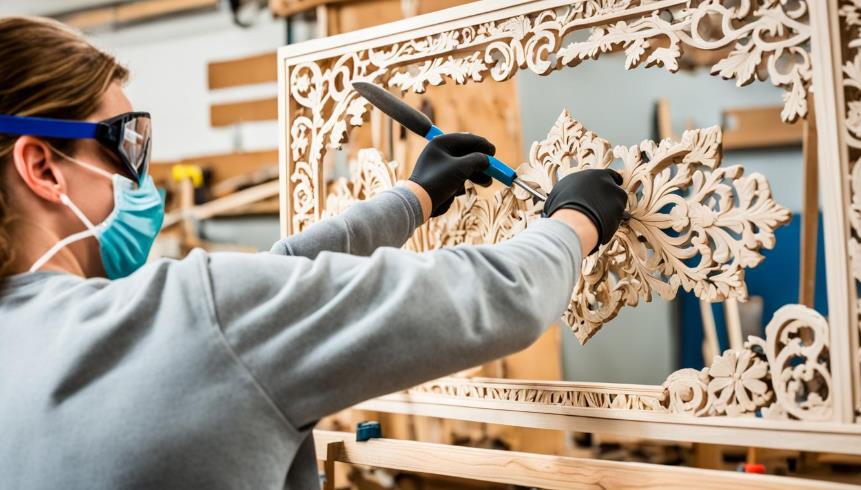
Furthermore, framing a mirror yourself provides a sense of accomplishment and satisfaction. It allows you to tap into your creativity, unleash your inner artist, and express your individuality. The process of choosing the frame, measuring and cutting the trim, and assembling the pieces can be a fun and rewarding experience. The end result is a mirror that reflects not only your reflection but also your personal style and craftsmanship.
Whether you’re a seasoned DIY enthusiast or a beginner looking to explore your creative side, DIY mirror framing offers endless possibilities. In the upcoming sections, we will guide you through the step-by-step process of framing a mirror, from planning and preparation to the final touches. Get ready to transform your plain mirror into a stunning centerpiece that adds character and style to your living space.
Planning Your Mirror Frame Project
When planning a mirror frame project, it’s essential to consider the style and design you want to achieve. Choosing the right frame style can make a significant impact on the overall look and feel of your mirror.
Before diving into the project, take into account factors such as the existing decor, the size of the mirror, and the desired aesthetic. Look for inspiration in interior design magazines, websites, or social media platforms to gather ideas that align with your personal taste and the overall theme of your room.
Measuring your mirror accurately is crucial for selecting the appropriate frame size and materials. Use a tape measure to determine the dimensions of your mirror, taking into account both the width and height. This information will guide you in choosing the right frame size and ensure a seamless fit.
Once you have measurements and a clear understanding of your desired style, it’s time to select the frame materials. Consider the durability, maintenance, and compatibility with your existing decor when choosing materials. Common options include wood, metal, and composite materials.
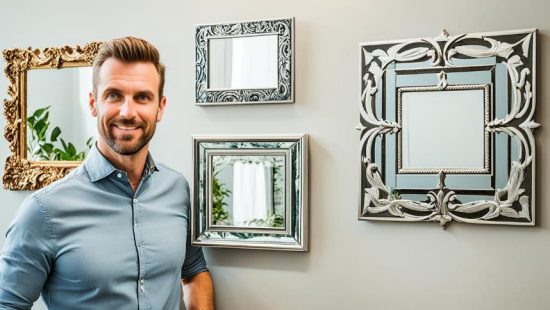
When it comes to selecting a frame style, consider the various options available, such as traditional, modern, rustic, or ornate. Each style can create a different ambiance and complement different interior design themes. Choose a frame style that resonates with your personal taste and enhances the overall aesthetic of the room.
While it’s important to choose a frame style that you love, it’s also crucial to consider the practical aspects. Think about how the frame will affect the functionality of the mirror, such as how it will be mounted to the wall or supported.
Once you have a clear plan in place, it’s time to gather the necessary materials and tools for your mirror frame project. With careful planning and consideration, you can create a mirror frame that adds beauty and style to your space.
Materials and Tools Needed for a Mirror Frame
Framing a mirror requires specific materials and tools to ensure a successful project. To get started, you’ll need the following:
- Frame: Choose a frame that fits your desired style and size. There are various options available, including wood, metal, and plastic frames.
- Adhesive: Use a strong adhesive specifically designed for mirror framing. This will ensure a secure bond between the mirror and the frame. Make sure to choose an adhesive that is suitable for the materials you are using.
- Paint or Stain: If you want to customize the color of the frame, you’ll need paint or stain. Select a color or finish that complements your overall design scheme.
- Miter Saw: A miter saw is essential for cutting the frame pieces at precise angles. This tool will help you achieve clean and accurate cuts for a professional-looking result.
- Tape Measure: Accurate measurements are crucial when framing a mirror. Use a tape measure to measure the dimensions of the mirror and the frame pieces.
- Sanding Block: A sanding block is used to smooth and prepare the frame for painting or staining. It helps remove any rough edges or imperfections, ensuring a polished finish.
- Clamps: Clamps are helpful for holding the frame pieces together while the adhesive dries. They provide stability and ensure that the frame is securely attached to the mirror.
Having these materials and tools on hand will make the mirror framing process easier and more efficient. Now that you have everything you need, you’re ready to move on to the next steps.
Preparation: Measuring and Cutting Trim
Before you can start framing your mirror, it’s essential to take accurate measurements and cut the trim to the appropriate size. This ensures a precise fit and a professional-looking finished product.
To begin, you’ll need a measuring tape to determine the dimensions of your mirror. Start by measuring the length and width of the mirror, making a note of the measurements.
Once you have the measurements, you can proceed to cut the trim for your mirror frame. You have two options for cutting the trim: using a miter saw or using a miter box and saw.
If you have access to a miter saw, it is the preferred tool for this task. Place the trim in the miter saw and set the saw to the desired angle, typically 45 degrees for a standard frame. Carefully cut each piece of trim according to the measurements you recorded earlier.
If you don’t have a miter saw, you can use a miter box and saw instead. Place the trim in the miter box and align the saw with the appropriate angle guide. Make precise cuts with the saw, following the measurements you took earlier.
Remember to take your time and make accurate cuts to ensure the trim fits perfectly around your mirror. It’s always a good idea to double-check the measurements and trim pieces before proceeding to the framing process.
How to Frame a Mirror?
Framing a mirror is a simple and rewarding DIY project that can instantly elevate the look of any space. In this section, we will guide you through the step-by-step process of framing a mirror, from applying adhesive to attaching trim pieces.
First, let’s start with applying adhesive to the mirror. For a secure bond, it’s important to choose a high-quality adhesive that is specifically designed for mirror framing. Apply the adhesive to the backside of the mirror, making sure to cover the entire surface evenly. This will ensure that the mirror stays securely in place within the frame.
Next, it’s time to attach the trim pieces to the mirror. When selecting the trim, consider the style and aesthetic you want to achieve. Measure and cut the trim to fit the dimensions of the mirror, ensuring precise cuts for a professional finish.
Before attaching the trim, double-check that it is properly aligned with the edges of the mirror. Apply a thin layer of adhesive to the backside of each trim piece, then press them firmly onto the mirror, aligning them with the edges and corners. Ensure that the trim pieces are securely attached and evenly spaced.
Once the adhesive has fully dried, your mirror frame is complete. Stand back and admire your craftsmanship as the framed mirror transforms the room with its added style and sophistication.
Now that you have learned how to frame a mirror, you can confidently tackle this DIY project and enjoy the beautiful results. In the next section, we will focus on attaching the bottom frame piece securely, ensuring the stability of the mirror frame.
Attaching the Bottom Frame Piece Securely
Attaching the bottom frame piece securely is a critical step in the process of framing a mirror. This ensures the stability and durability of the mirror frame, preventing any potential issues down the line. To effectively attach the bottom frame piece, follow these instructions:
- Carefully measure the length and width of the mirror’s bottom edge.
- Select a bottom frame piece that matches the desired style and dimensions of your mirror frame.
- Apply a thin layer of adhesive to the back of the frame piece, ensuring full coverage.
- Align the bottom frame piece with the bottom edge of the mirror, making sure it is centered.
- Press the bottom frame piece firmly against the mirror, applying gentle pressure to create a tight bond.
- Allow the adhesive to dry according to the manufacturer’s instructions.
By following these steps, you can securely attach the bottom frame piece to your mirror, ensuring a professional and polished finish. This will complete the foundation of your mirror frame, setting the stage for the rest of the framing process.
Fixing the Side Trim for Symmetry
Achieving symmetry is a crucial aspect when it comes to framing a mirror. To ensure proper alignment and symmetry in the mirror frame, it is essential to pay attention to the side trim. Properly fixing the side trim will result in a visually balanced frame that enhances the overall aesthetic of your mirror.
When working with side trim, it is important to start by measuring and cutting the trim to the appropriate size. Use a tape measure to measure the length of the mirror sides and transfer the measurements onto the trim. A miter saw or a miter box and saw can be used to accurately cut the trim to size.
Next, align the cut side trim pieces with the top and bottom frame pieces. This will ensure that the side trim is centered and properly positioned. Making sure that the side trim is evenly spaced from the mirror edges will help achieve a symmetrical look.
Once the side trim is in position, secure it to the mirror frame using an appropriate adhesive. Apply the adhesive to the back of the side trim and press it firmly onto the frame. Be sure to follow the manufacturer’s instructions for the specific adhesive you are using.
To ensure that the side trim is securely attached, use clamps or tape to hold the trim in place while the adhesive dries. This will prevent the trim from shifting or moving during the drying process, resulting in a perfectly aligned frame.
If desired, you can also use finishing nails or brads to further secure the side trim to the frame. However, be careful when using nails to avoid damaging the mirror surface.
Once the adhesive is completely dry and the side trim is securely fixed, you can proceed with the remaining steps to complete your mirror frame. By properly fixing the side trim for symmetry, you will achieve a professional and visually appealing mirror frame that enhances the overall look of your space.
Adding the Top Piece to Complete the Frame
After successfully attaching the bottom frame piece and fixing the side trim, it’s time to add the top piece to complete the frame. This final step will give your mirror frame a polished and finished look.
Before you begin, ensure that the bottom frame piece and side trim are securely in place. Take a moment to step back and double-check the alignment and symmetry of the frame to ensure everything is properly positioned.
Now, let’s proceed with adding the top piece to the mirror frame:
- Apply a generous amount of adhesive to the backside of the top piece.
- Hold the top piece against the top edge of the mirror, aligning it with the side trim and bottom frame piece.
- Press firmly to ensure a strong bond between the top piece and the mirror.
- Use a level to check if the top piece is straight. Make any necessary adjustments to achieve a perfectly horizontal alignment.
- Once you’re satisfied with the position, secure the top piece by attaching finishing nails or screws at the ends and intervals along the length.
- Make sure to countersink the nails or screws slightly to ensure they are flush with the surface of the frame.
- Repeat the process of applying adhesive, aligning, and securing the top piece for any additional sections of the frame.
After attaching the top piece, take a step back and inspect the frame from different angles. Ensure that all corners are tight and the frame is securely attached to the mirror. If necessary, make any final adjustments before the adhesive fully sets.
Once you’re satisfied with the final positioning of the top piece, allow the adhesive to dry according to the manufacturer’s instructions. This will ensure a secure bond between the frame and the mirror.
Customizing the Frame Design
Once you’ve framed your mirror, it’s time to unleash your creativity and make it truly your own. Customizing the frame design allows you to add a personal touch and elevate the overall aesthetic of your mirror.
There are several ways to customize your mirror frame design. One option is to paint the frame in a color that complements your room’s decor. Choose a paint color that enhances the style and ambiance you want to create. Whether you prefer a bold and vibrant look or a subtle and understated design, painting the frame can completely transform its appearance.
If you prefer a more natural and rustic look, staining the frame is a great option. Stains can bring out the natural beauty of wood and add warmth and depth to the frame. Consider different stain colors and test them on a small area of the frame to find the perfect shade for your desired look.
To add more visual interest and personality to your mirror frame, consider adding decorative elements. This could include applying stencils or decals, attaching metal accents, or even gluing on small embellishments like beads or buttons. These decorative elements can enhance the overall design and make your mirror frame truly unique.
Remember, when customizing your mirror frame design, it’s important to select the right finish that aligns with your desired aesthetic. Whether you choose to paint, stain, or add decorative elements, take your time and pay attention to detail to ensure a professional-looking result.
Adhesive Application Tips and Techniques
Proper adhesive application is crucial for a secure and long-lasting mirror frame. When choosing an adhesive for framing, it’s important to consider the materials you’re working with and the desired bond strength. Selecting the right adhesive will ensure a strong and durable connection between the frame and the mirror.
Here are some adhesive application tips to help you achieve a secure bond:
- Clean the surfaces: Before applying adhesive, make sure the frame and mirror surfaces are clean and free from dust, grease, and debris. Use a mild soap solution and a clean cloth to gently wipe the surfaces.
- Use the right adhesive: There are various types of adhesives available for mirror framing, including construction adhesive, mirror adhesive, and epoxy. Consider the specific needs of your project and choose an adhesive that is suitable for both the frame material and the mirror surface.
- Apply adhesive evenly: Apply a thin, even layer of adhesive to the back of the frame and the corresponding area on the mirror. Use a putty knife or a small brush to spread the adhesive evenly, ensuring full coverage.
- Press firmly: Once the adhesive is applied, press the frame firmly against the mirror surface to create a strong bond. Apply even pressure to ensure that the adhesive spreads evenly and there are no gaps or air pockets.
- Secure the frame: To ensure a secure bond, use clamps or tape to hold the frame in place while the adhesive dries. Follow the manufacturer’s instructions regarding drying time and recommended curing methods.
If you encounter any issues during adhesive application, here are some troubleshooting tips:
- If the adhesive is too thick or difficult to spread, you can thin it out with a small amount of solvent or water, following the manufacturer’s instructions.
- If the adhesive starts to dry before you can attach the frame, apply a fresh layer of adhesive to reactivate the bond and then proceed with the attachment.
- If there are any gaps or uneven areas in the bond, you can fill them with a suitable filler or caulk. Ensure that the filler or caulk is compatible with the adhesive and follows the manufacturer’s instructions.
By following these adhesive application tips and techniques, you can ensure a secure and professional-looking mirror frame that will stand the test of time.
Final Touches: Sanding and Painting the Frame
Before completing the mirror frame, it’s important to attend to the final touches. Once you have attached the trim pieces and ensured a secure bond, it’s time to sand and paint the frame for a polished and professional finish.
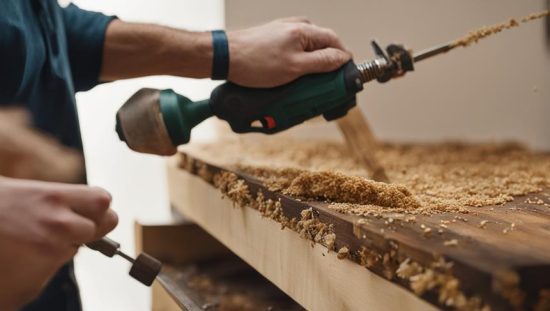
First, grab a sanding block and gently sand all surfaces of the frame. This step helps to remove any rough edges, imperfections, or uneven spots, resulting in a smooth and flawless surface. Be sure to pay attention to the corners and edges, as these areas may require more sanding to achieve a consistent look. Remember to wipe away any dust or debris before proceeding to the next step.
Once you have sanded the frame to your satisfaction, it’s time to paint. Choose a paint color that complements your decor and personal style. Acrylic or latex paint is suitable for wooden frames, while spray paint works well for metal or plastic frames. Apply the paint evenly with a brush or spray, making sure to cover all surfaces of the frame. Allow the first coat to dry completely before applying additional coats, if needed, to ensure a smooth and even finish. Take your time and pay attention to detail, as a well-painted frame can significantly enhance the overall look of your mirror.
After the final coat of paint has dried, inspect the frame for any touch-ups that may be required. Use a small brush to carefully correct any mistakes or areas that need additional coverage. This step is crucial for achieving a professional and flawless result.
Once you are satisfied with the final look of your painted frame, let it fully dry before handling or mounting the mirror. It’s important to follow the manufacturer’s recommendations for drying time to ensure the paint has cured properly.
When the frame is completely dry, you can proceed to the next step of mounting your framed mirror and enjoying the beautiful transformation it brings to your space.
Mounting Your Framed Mirror
Now that you have successfully framed your mirror, the final step is to mount it securely. Follow these steps to ensure a level and secure installation.
Choosing the Appropriate Hardware
Before hanging your mirror frame, it’s important to select the right hardware for the job. Consider the weight and size of your mirror when choosing hooks, brackets, or cleats to support the frame. It’s recommended to use wall anchors or screws that are appropriate for the wall type, such as drywall or plaster.
Ensuring a Level of Installation
Start by marking the desired location of your mirror frame on the wall using a level and a pencil. Double-check the markings to ensure they are accurately aligned. Next, use a drill to create holes for the wall anchors or screws. Insert the wall anchors or screw directly into the holes, making sure they are secure.
Attaching the Mirror Frame to the Wall
With the hardware in place, it’s time to hang the mirror frame. Carefully lift the frame and align it with the markings on the wall. Gently press the frame against the wall, ensuring that the hardware is securely attached. Finally, give the frame a gentle tug to confirm its stability.
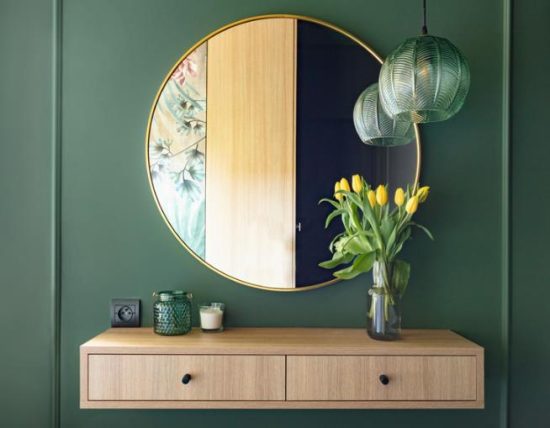
You have now successfully mounted your framed mirror. Step back and admire your handiwork, knowing that your mirror is securely attached and ready to enhance the beauty of your space.
FAQs on How to Frame a Mirror
How do you frame a mirror using wood trim?
To frame a mirror with wood trim, measure the dimensions, cut the trim to size, and attach the pieces using strong adhesive or nails for a custom look.
How do you frame a mirror with a pre-made frame kit?
Purchase a pre-made frame kit that fits your mirror size, follow the instructions to assemble the frame, and secure it to the mirror with the provided adhesive or mounting hardware.
How do you frame a mirror for a rustic look?
For a rustic look, use reclaimed wood or distressed trim pieces, cut them to fit the mirror’s edges, and attach them with a strong adhesive or small nails for a charming, weathered appearance.
How do I frame a mirror without removing it from the wall?
Measure the mirror’s dimensions, cut trim pieces to size, and use a strong adhesive or mounting tape for attatching the frame directly to the wall around the mirror, ensuring it is level and secure.